
Mama’s Holiday Wish List MemeTodaysMama and Provo Craft are giving away a sleighful of gifts this holiday season and to enter I’m sharing this meme with you.
1. What 5 items are on your holiday wish list this year? Santa's Village, New Flooring :), a new cell, new UGG's, a better knife set.
2. What is your favorite handmade gift you have received? This tiny little poinsettia themed box.
3. What handmade gift have you always wanted to tackle? Crocheting scarves
4. What was the best Christmas gift you received as a child? my bike
5. What items are on your kid’s wish list this year? ipod touch, Nintendo DS, a puppy(yea right)
6. What is your favorite holiday food? Grandma's cheesecake pie
7. What will you be hand-crafting for the holidays? hot/cold rice bags
8. What is your favorite holiday movie? the Polar Express
9. Favorite holiday song? Silver Bells
10. Favorite holiday pastime? Putting up the tree :)
Saturday, December 5, 2009

Tuesday, December 1, 2009
I Made It...Vintage NOEL Banner

I love the looks of the banners that are so popluar right now, so I tried my hand at one using some of my vintage bits! I think it turned out so cute!! I used vintage text pages, my crepe rosettes edged in silver glitter with more vintage shred. Everything is bound with ivory seam binding...I am just loving this one!


Toodles...Angie
Sunday, November 29, 2009
I Made It...Book Pages Wreath

Oh my goodness...I found a project that combines my love of vintage with something else I love: decorating for the holidays inexpensively!! This project is so easy and takes no skill at all! Just a foam wreath, a book you don't use anymore and a glue gun! I saw this project on Living With Lindsey and I just had to try it! Two hours later, I ended up with this beauty!!!

 Her tutorial is very easy to follow and the project turns out beautifully. Please do pay attention to the pencil tip as I burned the tar out of my hands, so do be careful. I added in some little tufts of tulle and a few ornaments to dress mine up! I am just pleased as punch with the outcome!

As always, leave me some comment love!!
Toodles...Angie
Thursday, November 26, 2009
Happy Thanksgiving...

On this very busy day, I just wanted to pop in and say Happy Thanksgiving to all. I am so very thankful for my family, friends and a very blessed life. I wish each of you a blessed day full of traditions and love!
Toodles...Angie
Tuesday, November 24, 2009
I Made It...Crepe Paper Rosettes
I love all things vintage...you have NO idea how my heart races to see old bits of velvet and tiny little pearly buttons (swoon...) Many years past, people used crepe paper not for throw away party decor but to pretty up important things. Who wouldn't love something so delicate and beautiful? I have taken my love of vintage and the ever useful crepe paper to create these little crepe paper rosettes that are the perfect accent for so many uses!! I like to think of these are the frosting on your basic cake! Confections for the crafter...
I make these in 2 sizes, a large and a mini. This tutorial is for the large and the mini will come at a later date...
Supplies needed:
Crepe paper streamers in your chosen color(s)
needle and thread (white or a matching color for your paper)
quick dry glue
bits and baubles to decorate with!
Now these little babies are not hard to make, but do require a light hand for the correct rippling effect, plus it can take some time to get everything done correctly. To start you will need 2 strips of streamer about 20" in length. Fold one of the streamers as pictured below.  This piece actually creates the top two layers. Place this piece on top of the remaing unfolded strip. Thread and knot your string (do a double knot to make larger knot so it won't pull through your paper.) Pinch your paper strips together and starting at one end start sewing your strips together.
  Weave the needle through the paper LOOSELY and once your needle is full, pull the paper onto the thread.
 Once you have reached the end of the strip, pull the paper tighter into the thread and your streamer will begin to make the rosette.
 The trickiest part is right here: you must tie off the string. Put your needle through the two last "pleats" and make a knot.
  Cut off your string and using your glue, adhere both ends of the rosette together.
This piece actually creates the top two layers. Place this piece on top of the remaing unfolded strip. Thread and knot your string (do a double knot to make larger knot so it won't pull through your paper.) Pinch your paper strips together and starting at one end start sewing your strips together. Weave the needle through the paper LOOSELY and once your needle is full, pull the paper onto the thread. Once you have reached the end of the strip, pull the paper tighter into the thread and your streamer will begin to make the rosette. The trickiest part is right here: you must tie off the string. Put your needle through the two last "pleats" and make a knot. Cut off your string and using your glue, adhere both ends of the rosette together. I usually pinch them together for a good seal. Now you decorate to your hearts content!!!
Glitter `em

Button `em

Bling `em

These are sturdier than you think, so they hold up well in lots of projects! Let me know what you think! Of course these are available in My Etsy Store if you love them, but don't have the time to make them yourself!
I have linked this tutorial to :

Toodles...Angie
Friday, November 20, 2009
I Made It...Felt Needle Book
In my wandering through blog world, I saw an adorable needle book and became inspired to create one of my own. My stash of sewing needles has been stored in the tomato pincushion that my dog used as a chew toy several years ago and a mixed lot of packaging (warning: ugly un-organized photo below!)

I am NOT a seamstress in any way shape or form, but thanks to my 9th grade home ec. teacher, Mrs. Anderson, I know how to use my sewing machine, and it has proved very useful over the years. The base of the project literally took 10 minutes to finish and was VERY easy with minimal sewing machine usage involved. Plus I was able to use the scraps of pink and white felt leftover from making my daughter's poodle skirt !! Recycle it baby...
You need:
a sewing machine
felt (measurements below) in 2 different colors
a set of snaps
embroidery floss

So you will start by cutting one color felt (your cover) 8" x 5". Then using the other color, cut the pages for your book 7" x 4 1/2". Cut 2-3 of this size depending on how many needles you need to store. Also cut one piece for your closure in the same color as your cover. This should be cut to 2" x 1/2".
Lay your cover down and then lay your pages stacked on top. I would use a few pins to secure these together and using your sewing machine, stitch a simple straight right down the middle to bind everything together. I would make 2 passes with your machine to take care of any stress on the seam.

Now your book is complete. Let's attach the closure. Take the small strip and flip your book upside down so that you are looking at the back flap of the outside cover. Using another straight stitch, secure one end of this strip in the middle of back.

Now, let attach our closing mechanism. I would like to add that you CAN use a button instead of snaps, but I was out of buttons (darn!) If you want to do the button, just attach the button to the front cover and cut a slit in the end of the strip as a button hole. If using the snaps, hand stitch your pieces into the appropriate spots.

Your basic book is now done. I will show photos below of how I embellished mine, but you can do this at your leisure and own taste :) Here you can see all my needles organized and no longer hiding down in my horrid little tomato!!! (Blogger wouldn't let me turn this photo for some reason...)

Now as previously mentioned, I like to dress up my projects, so using embroidery floss, I hand stitched this cute little flower design onto the front cover (once again, really missing my buttons as center pieces.) I will add these after making a stop at the store!

A back stitch is very simple to do... use this Stitch Guide from A Feathered Nest
because she does it a ton better than I do :)

I felt (there's my pun!) like my edges needed something, so I finished off everything with what I think may be called a blanket stitch???
And there you go! A needle book. I think these would make a fantastic inexpensive gift for anyone on your gift list who is a sewer...beginner all the way to expert! Let me know if you have any questions.
Toodles...Angie
Wednesday, November 18, 2009
I Made It...Easy Peasy Layered Flowers...
 These are sooooo cute and incredibly easy to make. You can find lots of tutorials around the internet on how to make them, but boiling it down you need...
 scissors
fabric (several different colors is nice)--use old clothing even!
needle and thread
button (optional)
stick pin (optional)
Start by cutting out small circle from your choice of the fabric. Now this next part is REALLY hard...lay that circle on top of your next fabric and cut a slightly larger circle. Ok...sorry for sassiness!!! Now just keep alternating fabrics and circle sizes. I usually aim for 6-7 circles to make a nice full flower. Now use the stick pin to secure the circles if you want the fabrics to not slide around. Take up your handy needle and thread. Starting from the backside of your flower stitch up through all the layers and back down a couple of times to secure everything together.


To make it ruffle-y (word??) you pull your needle back up to the top of the flower and taking your first layer, gather up some of the material onto the needle and pull the thread tightly. This will create a ruffled effect. Then repeat with the othe
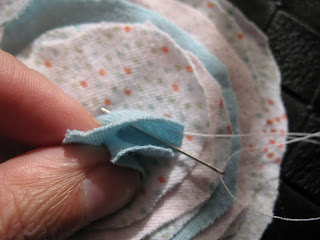 r layers. If it gets too ruffled, you may want to do every other layer (this will depend on what kind of fabric you use.)
  Now stitch on your button and voila`, a fabric flower!! Easy peasy style... You can use these for a million uses. Add to hats, shirts, scarves, make a cute brooch, dress up a headband, put on pillows or add to gift wrapping!
This will create a ruffled effect. Then repeat with the other layers. If it gets too ruffled, you may want to do every other layer (this will depend on what kind of fabric you use.) Now stitch on your button and voila`, a fabric flower!! Easy peasy style... You can use these for a million uses. Add to hats, shirts, scarves, make a cute brooch, dress up a headband, put on pillows or add to gift wrapping! Let me know if you have any questions...Now, what are you waiting for? Off you go to make easy peasy flowers!~
Toodles...Angie
Subscribe to:
Posts (Atom)


 Posts
Posts

