
I love the vintage richness of old text book pages. The yellow-brown tint of days gone bye and knowing that countless fingers have touched the very same pages I am (insert wistful sigh here...) So it goes with out saying that this is one of my favorite mediums to work with. In my every growing obession with creating Christmas decor this year (yikes!), I have come up with these fantastically vintage looking Christmas cones. But, how to keep them looking great for the years to come while stashed in the attic above??? My solution is Modge Podge! Get ready for my rockin' tutorial...
You will need:
vintage paper
cardstock (1 piece for each cone)
tulle, ribbon or some type of hanging material ( I used vanilla colored seam binding)
modge podge(hereafter known as MP)
glue (quick dry is best!)
foam brush
assorted embellies to "frost" your cones with
shred or filler for the cones
I wanted a set that spelled out JOY, so for my tutorial, I will be creating 3 cones. First you will need to create your cone shapes by rolling the paper and then using your glue, secure the cones closed.  Tear your vintage paper into smallish pieces (different sizes and shapes are ok).
 Using your foam brush, apply the MP to the outside of the paper cone and working quickly begin applying the torn paper pieces. Work in small sections so your MP doesn't dry before your paper is applied. Cover the entire cone with paper and then add another layer of MP to the top for durability. Warning--try to use a little MP as possible to prevent wrinkling of the paper and cone. Less is more in this case. Set cones aside to dry and when dry, use punch a hole in either side of the cone for the hanger. Now as these don't weigh in very heavy, you could attach these to a LONG cut wide piece of ribbon and hang vertically. Hmmm...another tutorial is brewing in my head.
 Now comes the fun part---frosting your cone with embellies. I urge you to use some kind of edging material (lace, garland, trim) to cover your upper edge. I used some fabulous crepe paper ruffles that I whipped up and then inked (ya know I like my vintage fix!) and then attached them with glue (and I heart Fabri-tac.)
 I tied on my seam binding as my hangers. And now you get to frost them. I used some of my
Tear your vintage paper into smallish pieces (different sizes and shapes are ok). Using your foam brush, apply the MP to the outside of the paper cone and working quickly begin applying the torn paper pieces. Work in small sections so your MP doesn't dry before your paper is applied. Cover the entire cone with paper and then add another layer of MP to the top for durability. Warning--try to use a little MP as possible to prevent wrinkling of the paper and cone. Less is more in this case. Set cones aside to dry and when dry, use punch a hole in either side of the cone for the hanger. Now as these don't weigh in very heavy, you could attach these to a LONG cut wide piece of ribbon and hang vertically. Hmmm...another tutorial is brewing in my head. Now comes the fun part---frosting your cone with embellies. I urge you to use some kind of edging material (lace, garland, trim) to cover your upper edge. I used some fabulous crepe paper ruffles that I whipped up and then inked (ya know I like my vintage fix!) and then attached them with glue (and I heart Fabri-tac.) I tied on my seam binding as my hangers. And now you get to frost them. I used some of my Rosettes and some glittery letters and attached it all to the front. Then I filled them with some vintage paper shred
 And viola`...here they are! They will be gracing my wall (or where I decide to put them on display) for years to come thanks to my MP!

Let me know what you think!!!
Toodles...Angie


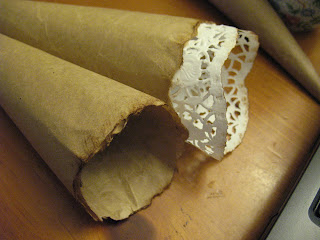 Your top probably looks not so nice (right?), so for this cone I chose to rip my papers for a rough edge, but you can use decorative scissors for scalloped edge, or in cones past I have traced a pattern inside the cone and cut out a smooth edge too. Now using your ink pad/sponge and gently ink the outside for that slightly aged look. Now for your inner cone. I usually use a doily for this, but you could use another type of paper. I would suggest that you cut it into a circle shape(use a dinner plate as a guide and this will make for a good pre-finished edge. Once again roll into a cone shape and play with it. Drop this cone into your first cone and let it unroll until it matches matches shape with your larger cone.
 Using your clothes pin again, secure this second cone and remove it. Now apply your glue and then ink the edges as before. Once the glue is dry, apply glue to the INSIDE upper edge of your first cone and now re-insert your small cone inside. Ink the edge of this cone as well. Using the hole punch, make 1 hole on either side of the cone and thread through your ribbon or tulle as a hanger. Viola`!! It is done. Now comes the fun part...decorating. I have used a crepe paper rosette that I made, but you can use buttons, lace, silk flowers, whatever looks good to you! When you are all done, lightly stuff the shredded paper (or whatever filler you are using) inside. If you have any questions, just email me or leave a comment and I will help you out!!
 Here are some of the other ones that I've created!


 Posts

