
My Little Cupcake is having a luscious little giveaway for a new Bakearella cupcake book and one of her own little cupcake POP molds!! How exciting!! Check it out!
Toodles...Angie


The Vintage Pearl offers a ton of lovely options, including this one. Can't you see your family names stamped on this little baby?

Or this adorable little number from sTuckintheCoop . I can barely stand the cuteness!!! See the names at the top of the "eggs?"

Now if you prefer a little custom for your wrist, check out this personalized quote cuff from Silver Bloom Studio . I would love this as a birthday gift!

And every woman needs a little shine for her lobes. These little handstamped birdies from Tiny Tokens Designs are perfectly portioned! Hmmm...I seem to have a thing for birds?

And lastly, lets not forget our guys. Check out this keyring from Jessica Rae Jewellery . I think the hubbs may get this for Father's Day!!!
So do a little searching of your own and I guarantee you will find the perfect personalized piece for whatever your needs! Take care friends...
 Buttons.
 Love this lovely, shiny bauble...
 photo by lilfish on flickr
 image courtesy of Karipearls.com
 Tear your vintage paper into smallish pieces (different sizes and shapes are ok).
 Using your foam brush, apply the MP to the outside of the paper cone and working quickly begin applying the torn paper pieces. Work in small sections so your MP doesn't dry before your paper is applied. Cover the entire cone with paper and then add another layer of MP to the top for durability. Warning--try to use a little MP as possible to prevent wrinkling of the paper and cone. Less is more in this case. Set cones aside to dry and when dry, use punch a hole in either side of the cone for the hanger. Now as these don't weigh in very heavy, you could attach these to a LONG cut wide piece of ribbon and hang vertically. Hmmm...another tutorial is brewing in my head.
 Now comes the fun part---frosting your cone with embellies. I urge you to use some kind of edging material (lace, garland, trim) to cover your upper edge. I used some fabulous crepe paper ruffles that I whipped up and then inked (ya know I like my vintage fix!) and then attached them with glue (and I heart Fabri-tac.)
  I tied on my seam binding as my hangers. And now you get to frost them. I used some of my
  And viola`...here they are! They will be gracing my wall (or where I decide to put them on display) for years to come thanks to my MP!
Let me know what you think!!!


Toodles...Angie

Oh my goodness...I found a project that combines my love of vintage with something else I love: decorating for the holidays inexpensively!! This project is so easy and takes no skill at all! Just a foam wreath, a book you don't use anymore and a glue gun! I saw this project on Living With Lindsey and I just had to try it! Two hours later, I ended up with this beauty!!!

 Her tutorial is very easy to follow and the project turns out beautifully. Please do pay attention to the pencil tip as I burned the tar out of my hands, so do be careful. I added in some little tufts of tulle and a few ornaments to dress mine up! I am just pleased as punch with the outcome!


 This piece actually creates the top two layers. Place this piece on top of the remaing unfolded strip. Thread and knot your string (do a double knot to make larger knot so it won't pull through your paper.) Pinch your paper strips together and starting at one end start sewing your strips together.
  Weave the needle through the paper LOOSELY and once your needle is full, pull the paper onto the thread.
 Once you have reached the end of the strip, pull the paper tighter into the thread and your streamer will begin to make the rosette.
 The trickiest part is right here: you must tie off the string. Put your needle through the two last "pleats" and make a knot.
  Cut off your string and using your glue, adhere both ends of the rosette together.
 I usually pinch them together for a good seal. Now you decorate to your hearts content!!!


These are sturdier than you think, so they hold up well in lots of projects! Let me know what you think! Of course these are available in My Etsy Store if you love them, but don't have the time to make them yourself!
I have linked this tutorial to :


Now, let attach our closing mechanism. I would like to add that you CAN use a button instead of snaps, but I was out of buttons (darn!) If you want to do the button, just attach the button to the front cover and cut a slit in the end of the strip as a button hole. If using the snaps, hand stitch your pieces into the appropriate spots.

Your basic book is now done. I will show photos below of how I embellished mine, but you can do this at your leisure and own taste :) Here you can see all my needles organized and no longer hiding down in my horrid little tomato!!! (Blogger wouldn't let me turn this photo for some reason...)

Now as previously mentioned, I like to dress up my projects, so using embroidery floss, I hand stitched this cute little flower design onto the front cover (once again, really missing my buttons as center pieces.) I will add these after making a stop at the store!

A back stitch is very simple to do... use this Stitch Guide from A Feathered Nest
because she does it a ton better than I do :)

I felt (there's my pun!) like my edges needed something, so I finished off everything with what I think may be called a blanket stitch???
And there you go! A needle book. I think these would make a fantastic inexpensive gift for anyone on your gift list who is a sewer...beginner all the way to expert! Let me know if you have any questions.
Toodles...Angie
 These are sooooo cute and incredibly easy to make. You can find lots of tutorials around the internet on how to make them, but boiling it down you need...

 This will create a ruffled effect. Then repeat with the othe
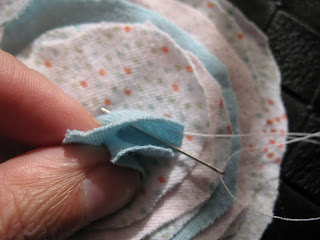 r layers. If it gets too ruffled, you may want to do every other layer (this will depend on what kind of fabric you use.)
  Now stitch on your button and voila`, a fabric flower!! Easy peasy style... You can use these for a million uses. Add to hats, shirts, scarves, make a cute brooch, dress up a headband, put on pillows or add to gift wrapping!
 Let me know if you have any questions...Now, what are you waiting for? Off you go to make easy peasy flowers!~


 Posts
All Comments
Posts
All Comments


