


This is such a cute idea that you can make for almost FREE (who doesn't love the sound of that?) with various craft supplies you have around your house! Now I have been making cones for a couple of years now. I have sold them on my website and at various art shows and I have given lots away as gifts too! Mine tend to lean more toward the vintage luxe direction, but you can seriously dress them up or down to your own taste. I just yesterday finished up 10 of these babies. 8 are for a dinner fundraiser for my Mom's Ellis County Republican Women's Club (if you are there you'd better be sitting at her table!!!) and then 2 to donate to the kid's school for decorating the 4th grade tree at the 2009 Festival of Trees. They are so cute filled with candy, soap, small gifts and gift cards!! You can mix it up for an holiday or occasion...So let's get started!
Supplies needed:
papers
ink pad & sponge
doilies (optional)-I used large round ones cut in half
ribbon or tulle
scissors
clothes pin or clamp
adhesive (should be quick drying for best results)
filler (shredded paper works really well!)
decorations of your choice
hole punch
First you need to determine which paper is your outer cone. In this photo believe it or not I used some type of brown packing paper from work, but just pick something that you want to see the most of :). Now roll it into a cone shape. Play with it for a little bit. You'll notice that depending on how you roll depends on how long and wide the cone is. So pick your preferred shape and secure it with the clothes pin (you might be able to use a large paper clip too.) Get your glue and unroll just a small portion of the cone...enough to apply the glue to secure the cone closed.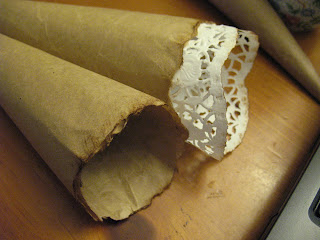 Your top probably looks not so nice (right?), so for this cone I chose to rip my papers for a rough edge, but you can use decorative scissors for scalloped edge, or in cones past I have traced a pattern inside the cone and cut out a smooth edge too. Now using your ink pad/sponge and gently ink the outside for that slightly aged look. Now for your inner cone. I usually use a doily for this, but you could use another type of paper. I would suggest that you cut it into a circle shape(use a dinner plate as a guide and this will make for a good pre-finished edge. Once again roll into a cone shape and play with it. Drop this cone into your first cone and let it unroll until it matches matches shape with your larger cone.
  Using your clothes pin again, secure this second cone and remove it. Now apply your glue and then ink the edges as before. Once the glue is dry, apply glue to the INSIDE upper edge of your first cone and now re-insert your small cone inside. Ink the edge of this cone as well. Using the hole punch, make 1 hole on either side of the cone and thread through your ribbon or tulle as a hanger. Viola`!! It is done. Now comes the fun part...decorating. I have used a crepe paper rosette that I made, but you can use buttons, lace, silk flowers, whatever looks good to you! When you are all done, lightly stuff the shredded paper (or whatever filler you are using) inside. If you have any questions, just email me or leave a comment and I will help you out!!
Your top probably looks not so nice (right?), so for this cone I chose to rip my papers for a rough edge, but you can use decorative scissors for scalloped edge, or in cones past I have traced a pattern inside the cone and cut out a smooth edge too. Now using your ink pad/sponge and gently ink the outside for that slightly aged look. Now for your inner cone. I usually use a doily for this, but you could use another type of paper. I would suggest that you cut it into a circle shape(use a dinner plate as a guide and this will make for a good pre-finished edge. Once again roll into a cone shape and play with it. Drop this cone into your first cone and let it unroll until it matches matches shape with your larger cone. Using your clothes pin again, secure this second cone and remove it. Now apply your glue and then ink the edges as before. Once the glue is dry, apply glue to the INSIDE upper edge of your first cone and now re-insert your small cone inside. Ink the edge of this cone as well. Using the hole punch, make 1 hole on either side of the cone and thread through your ribbon or tulle as a hanger. Viola`!! It is done. Now comes the fun part...decorating. I have used a crepe paper rosette that I made, but you can use buttons, lace, silk flowers, whatever looks good to you! When you are all done, lightly stuff the shredded paper (or whatever filler you are using) inside. If you have any questions, just email me or leave a comment and I will help you out!! Here are some of the other ones that I've created!


Toodles...Angie


No comments:
Post a Comment
Thanks for stopping by! If you like what you see, then follow my blog. If not just say hello and let me know what you think :)